Using the Debugger for Auto Start Conditions
The Userflow Debugger is your primary tool for diagnosing issues with flow triggering, including why a flow with Auto Start conditions isn’t appearing when expected.
This guide explains how to use the debugger to pinpoint which specific conditions are preventing a flow from starting.
Launching the Debugger
To activate the debugger:
- Click the Userflow Chrome extension icon in your browser toolbar. (In case you don’t have the chrome plugin installed , here is the installation page link)
- The debugger panel will appear on the current page.
- To close the debugger, simply click the extension icon again.
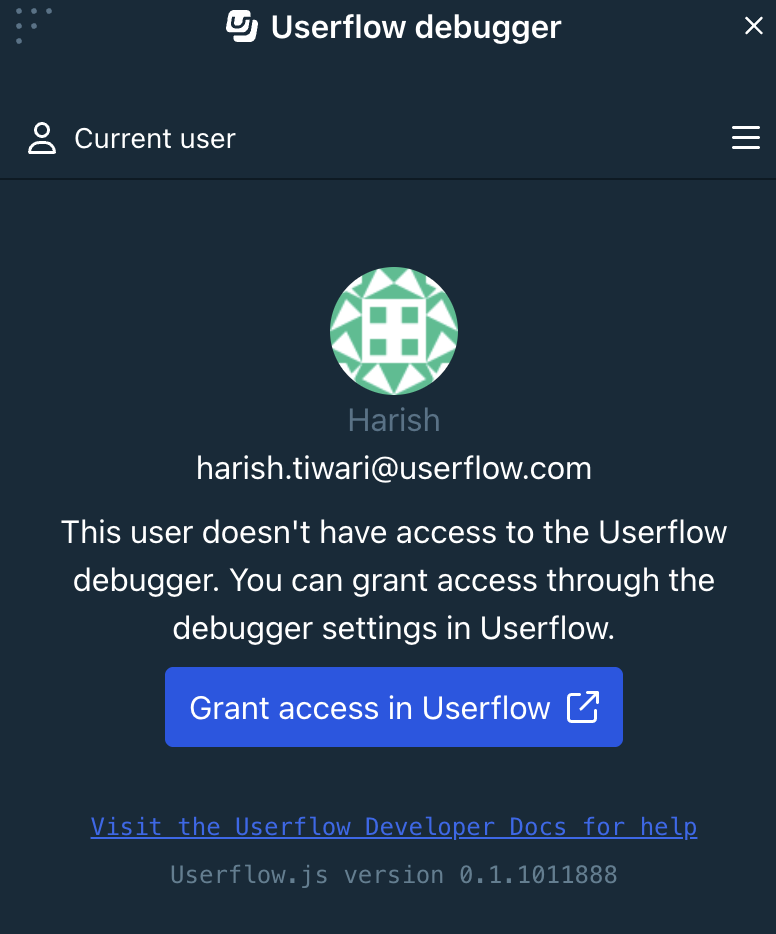
Granting Debugger Access
If you are troubleshooting directly in a user’s context or your own:
- Launch the Userflow Debugger via the Chrome extension.
- Click the Verify Setup dropdown menu.
- Select Current user.
- Click the Grant access in Userflow button. This will redirect you to the Debugger settings page in the Userflow Builder. If the signed in user already has access to the debugger, this button will not show up.
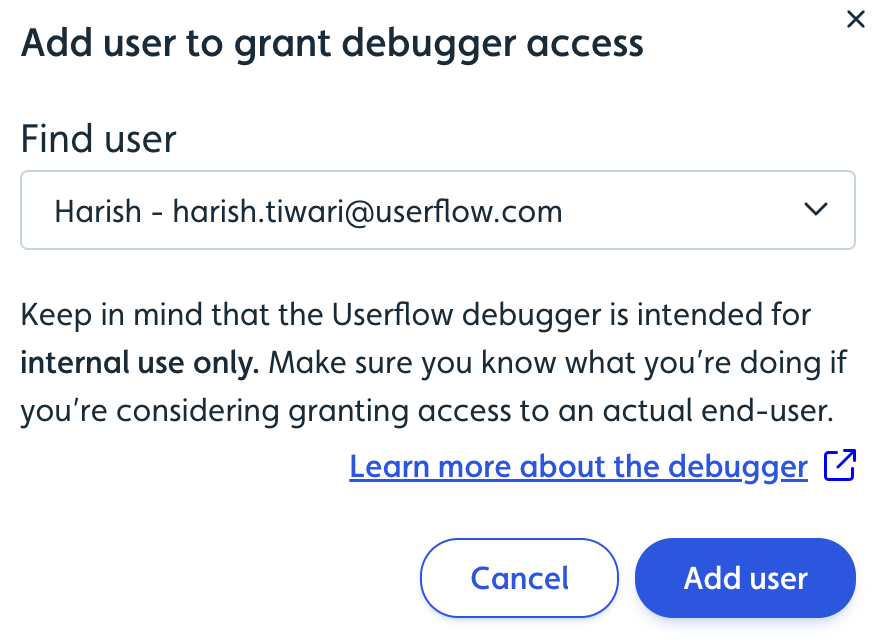
5.Click Add user and confirm the User ID is correct. The current browser session now has debugger analysis capabilities enabled.
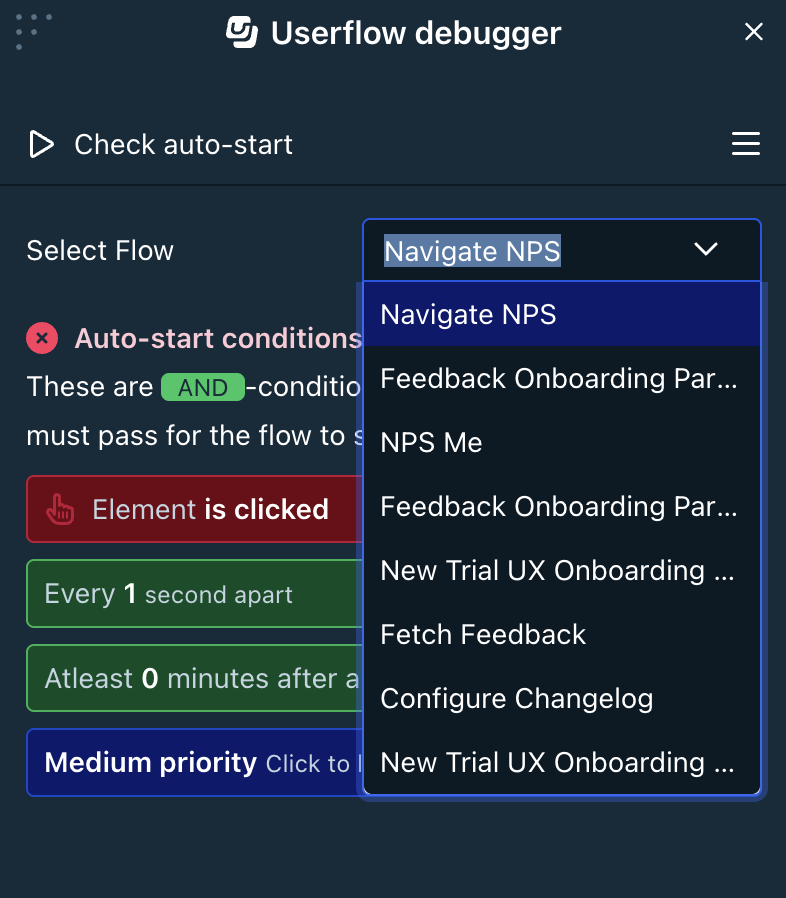
Checking Auto Start Conditions for a Flow
- With the debugger open, click the ‘Check auto start’ option from the debugger dropdown
- Select the specific flow you want to investigate from the ‘Select flow’ dropdown list.
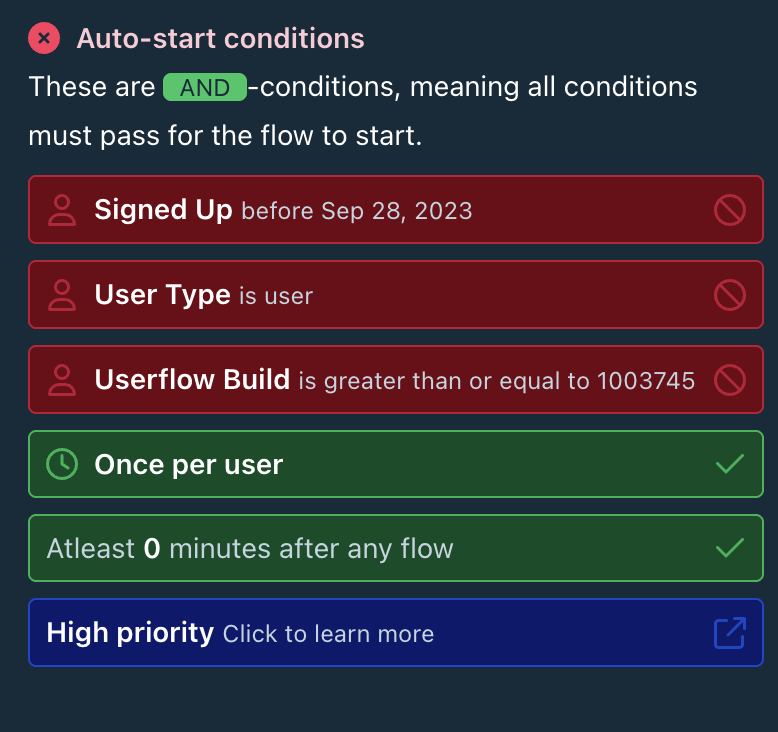
Understanding Condition Status
Once a flow is selected, the debugger displays its Auto Start conditions as colored “pills”. Each pill represents a condition or a group of conditions:
- Red Pill Indicates a condition that is currently blocking the flow from starting. This is the reason the flow isn’t triggering.
- Green Pill Indicates a condition that passes the check. This condition is met.
- Violet Pill Indicates a condition that is awaiting an action or time constraint (e.g., waiting for time to elapse before re-triggering, waiting for user input).
- Yellow Pill Signifies temporary conditions are preventing the flow, often related to frequency or delays. Expand this pill to see the specific underlying condition(s)
Common Auto Start Conditions Checked
The debugger evaluates various conditions. Here are common ones that can block a flow:
-
Attribute: Checks if the current user or their company matches the specified User Attribute or Company Attribute filters. Requires attributes sent via Userflow.js, an integration (e.g., HubSpot), or the API.
-
Current page: Checks if the user is on the specific URL path defined in the condition.
-
Event: Checks if the user has performed the required tracked event. Events can be sent via userflow.track in Userflow.js or created using no-code Event Trackers.
-
Segment: Checks if the user is currently part of the specified Segment.
-
Flow/Checklist: Checks the completion status (e.g., Completed, Seen) of another specified flow or checklist.
-
Element: Checks if a specific UI element (identified by a selector) is present or has been clicked in your application.
-
Text input value: Checks if a form input field contains a specific value entered by the user.
-
User fills in input: Checks if the user has entered any value into a specific input field.
-
Current time: Used for scheduling flows. Checks if the current date/time is before or after the configured time.
-
Wait: Checks if the configured delay period has passed after all other conditions were met.
-
Frequency of trigger: Checks if the flow has already been shown based on limits like “Only show once” or recurrence settings.
-
Delay Start After Previous Flow: Checks if the required minimum time has passed since another specified flow was triggered.
-
Constrain flow to current company (Advanced Setting): If enabled, checks if the user’s current company context matches the one they had when they first qualified for the flow. Prevents triggering if the user switches companies mid-session.
Flow Trigger Precedence
What happens if multiple flows meet their Auto Start conditions simultaneously for a user? Userflow applies these tie-breaker rules to decide which one flow triggers:
- Flows the user has never seen before are prioritized over flows they have seen.
- If all eligible flows have been seen before, the one whose last occurrence was seen the longest time ago is prioritized.
- If still tied (e.g., multiple flows never seen before), the flow with the higher Priority setting (configured in Flow Settings) triggers first.
- If priorities are also tied, the flow that was created earliest (has the oldest creation date) is prioritized.
Taking Action
Once the debugger shows you the specific Red condition(s) blocking the flow, you can:
- Adjust the flow’s Auto Start conditions in the Userflow Builder to better match your requirements.
- Verify that the necessary user attributes, events, or page states are correctly implemented in your application. After making updates, re-check the conditions using the debugger to confirm the pills turn Green and the flow triggers as expected.